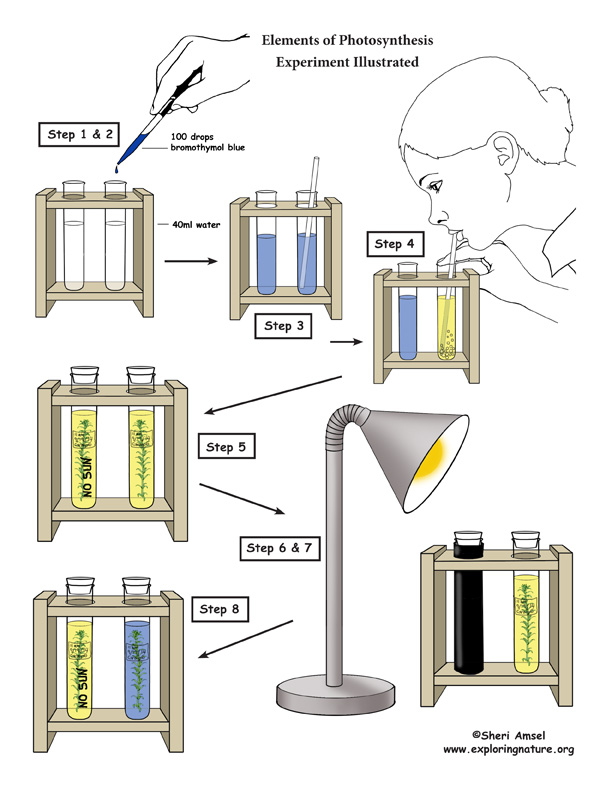

Experiment - The Elements of Photosynthesis
Goals: For photosynthesis to occur, a plant needs sunlight, water and carbon dioxide. To see photosynthesis in action, we will observe how a green plant (elodea) uses sunlight to take in CO2 and release O2 (control). In addition, we will deny sunlight to another specimen, to observe how photosynthesis does not occur without sunlight. Follow the procedures below to complete this experiment.
Materials:
(two per group) test tubes, stoppers, straws
(one per group) wax pencil, scissors, eye droppers, measuring beaker
specimens of elodea (from local pet store)
light source (grow light or sunny window)
bromothymol blue (BTB) as a CO2 indicator
tap water that has sat out for at least 24 hours (chlorine will evaporate)
black construction paper and tape
Procedures:
Break students down into groups of 3-4 with each group getting a set of two test tubes. Students in each group should take turns completing each of the following steps in each group.
1. Measure 40ml of the prepared tap water into each of their two test tubes.
2. Using the eye dropper, add about 100 drops of the bromothymol blue into each of the test tubes.
Important Fact: Bromothymol blue is used as an indictor for the presence of carbon dioxide.
3. Using a separate straw for each test tube, mix the water and bromothymol blue in each of the test tubes (leaving the straws in each test tubes afterward).
Thinking Moment: How can you add CO2 to the test tubes?
4. Doing one test tube at a time, cover the top with a finger to prevent splashing and then gently blow carbon dioxide into the test tube through the straw until the liquid turns yellow.
Discuss what the change in color indicates about the contents of the test tubes.
5. Cut a small sprig of elodea using scissors (make an angular cut in the stem) and place the plant bit in each of the test tubes. Then stopper them. Label each with the time, date and group number.
6. Add the words “no sun” to one of the test tubes using the wax pencil and wrap it with black construction paper, taping it in place so that no sunlight can get in.
7. Place both test tubes in a holder in front of a light source (sunny window or grow light) so that they both get the same amount of warmth even though one will get no light.
Thinking Moment: Can you predict what will happen over the next few hours? Discuss.
8. Several hours later (or next class period), have students remove the black paper from their test tube and compare the color of both liquids in the two test tubes.
Observation: Explain what changed in the test tubes.
Critical Thinking:
A. Explain what happened in this experiment.
B. Using the formula for photosynthesis explain how you simulated each part:
water + CO2 + sunlight = O2 + glucose
Experiment - The Elements of Photosynthesis Worksheet
1. How did blowing into the water and bromothymol blue provide one of the elements needed for photsynthesis?
2. How did adding the elodea (pond weed) to the test tube and setting it in front of light cause the color of the liquid to change?
3. Why did the liquid in the test tube covered in black paper not change color the way the uncovered liquid did?
4. Why did you have to wait for a few hours for the color change to occur?
5. Can you explain in your own words how this experiment demonstrated photosynthesis?
When you research information you must cite the reference. Citing for websites is different from citing from books, magazines and periodicals. The style of citing shown here is from the MLA Style Citations (Modern Language Association).
When citing a WEBSITE the general format is as follows.
Author Last Name, First Name(s). "Title: Subtitle of Part of Web Page, if appropriate." Title: Subtitle: Section of Page if appropriate. Sponsoring/Publishing Agency, If Given. Additional significant descriptive information. Date of Electronic Publication or other Date, such as Last Updated. Day Month Year of access < URL >.
Amsel, Sheri. "Photosynthesis Investigation " Exploring Nature Educational Resource ©2005-2024. December 13, 2024
< http://mail.exploringnature.org/db/view/1250 >
